

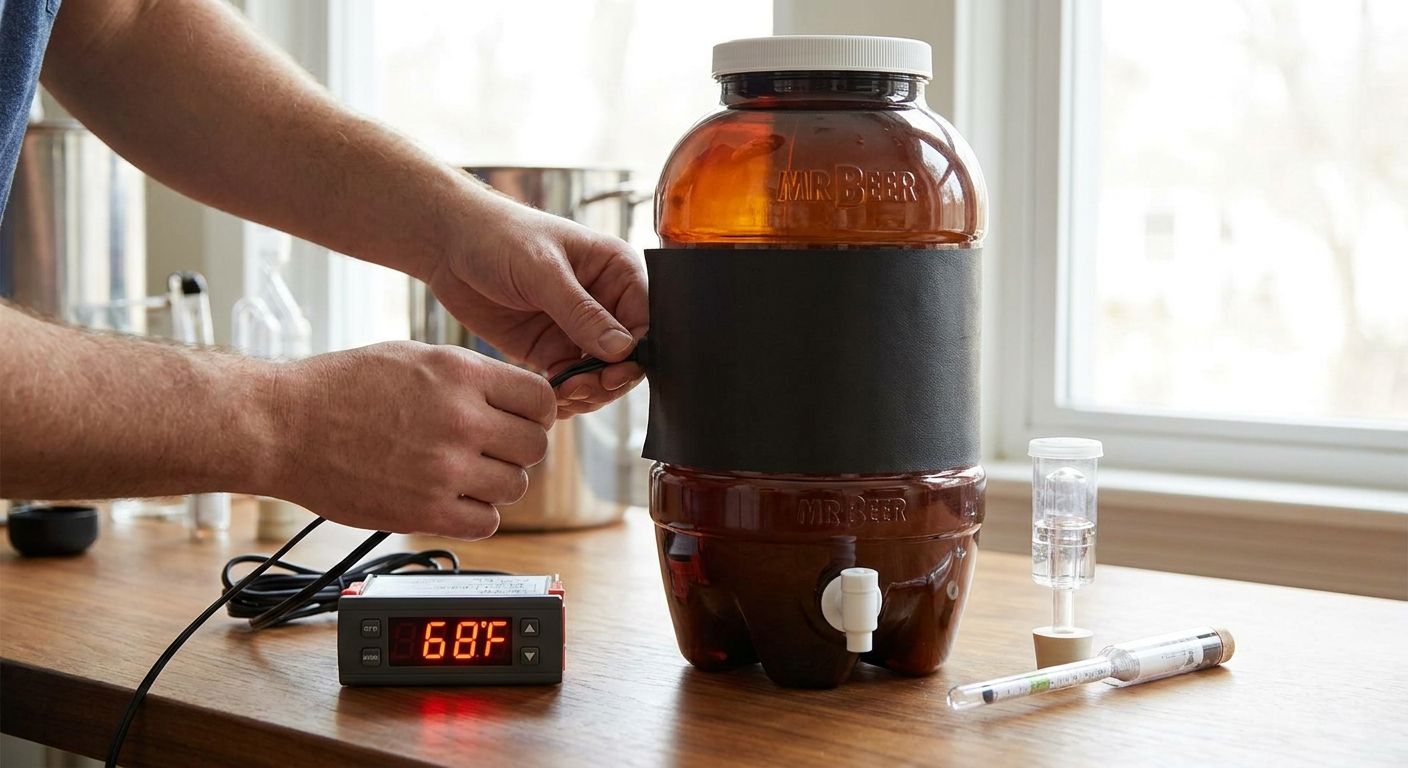
Checking your Mr. Beer fermenter's temperature with a stick-on strip thermometer and manually opening a closet door to cool it down keeps fermentation swinging several degrees a day. Wire a two-stage digital temperature controller between your fermenter setup and a heat source or a cooling appliance instead, and the controller holds a steady set point around the clock without you touching anything.
- A temperature controller for your Mr. Beer fermenter mainly comes down to correct probe placement and a small differential setting.
- Tape the probe to the fermenter wall under insulation, never let it read room air, or the controller cycles on the wrong number.
- Ale-style kits generally ferment warmer; lager-style kits need a cooler, steadier setup, so always check your kit's printed instructions for the exact number.
- A 1-2 degree F differential keeps a small heat source from short-cycling on a single fermenter.
- A basic single-stage controller with a heat source solves most warm-room problems; a two-stage unit adds cooling for lager brewing.
Why this matters
Yeast produces cleaner, more consistent flavor when it stays inside a narrow temperature window for the whole fermentation, not just at pitching. A room that drifts from 62F at night to 78F in the afternoon pushes yeast to work faster than it should, and that shows up as fusel heat, harsh esters, or an unfinished gravity reading.
A temperature controller removes the guesswork by switching a heat source or a cooling appliance on and off automatically based on the actual beer temperature, not the room temperature. For anyone running a Mr. Beer fermenter in a garage, basement, or apartment closet where ambient temperature isn't stable, this is the single upgrade that does more for consistency in 2026 than any other single piece of equipment.
Follow your kit's printed Mr. Beer kit instructions for the specific fermentation temperature it calls for. This guide covers the controller setup itself, not the number for any one recipe.
Before you start
- A two-stage digital temperature controller with a probe and two switched outlets (one for heating, one for cooling), or a simpler single-stage unit if you only need heat.
- A heat source (a fermentation wrap or a small space heater on a low setting) and, if you're targeting cooler lager temperatures, access to a mini fridge or an unheated space that stays consistently cool.
- Insulation to wrap around the fermenter — a towel or a purpose-built fermenter wrap works, since the probe reading depends on it.
- The gotcha: tape the probe directly against the side of the Mr. Beer fermenter, underneath the insulation, so it reads beer temperature and not room air. A probe left dangling in open air will make the controller chase room swings instead of holding the fermenter steady, which defeats the entire setup.
Set up the probe and heat source
- Plug the heat source (fermentation wrap or space heater) into the controller's heating outlet, not directly into the wall.
- Tape the temperature probe flat against the outside wall of the fermenter, roughly at the midpoint of the liquid level.
- Wrap insulation around the fermenter and the taped probe together so the probe sits sandwiched against the fermenter wall, not exposed to the room.
- Plug the controller itself into a wall outlet.
Expected result: the probe display on the controller should read a number close to the room temperature at first, then start climbing once the heat source kicks on.
Configure the temperature controller
- Power on the controller and locate the Set Temperature (sometimes labeled SET or SV) control.
- Confirm the controller is reading in Fahrenheit or Celsius correctly before entering a target — this is the easiest step to skip and the one that causes the biggest mistakes.
- Enter your target fermentation temperature using the up/down buttons, then confirm.
- Locate the differential (sometimes called hysteresis) setting and set it to roughly 1-2 degrees F for a single small fermenter. A tighter differential means more frequent, shorter heating cycles; a looser one means slower drift between cycles.
Expected result: the controller's outlet powers the heat source whenever the probe reads below your set point minus the differential, and cuts it off once the set point is reached.
Set the target temperature and differential
Use your kit's own instructions for the actual number to enter — that's the accuracy-critical part. As a general reference point, ale yeast strains commonly used in homebrewing tend to work best in the 60-72F range, while lager yeast strains typically want something closer to 45-55F. These are broad industry ranges, not a claim about any specific Mr. Beer recipe kit's yeast, so treat them as a sanity check rather than a substitute for the number printed on your kit.
Once the set point and differential are entered, leave the controller alone for the first 24 hours and just watch the display cycle. If the temperature holds within a degree or two of your target without wild overshoots, the setup is dialed in.
Cooling setup for lagers (the second variant)
Brewing a pilsner or other lager-style beer means the challenge flips: instead of adding heat, you need to hold a cooler, steadier temperature than most rooms naturally provide. The workflow is nearly identical, just with the second outlet doing the work.
- Place the fermenter inside a mini fridge or an unheated closet.
- Plug the fridge (or a small cooling fan setup) into the controller's cooling outlet.
- Tape the probe to the fermenter wall exactly as in the heating setup, under insulation if the fridge cycles hard.
- Set your target temperature and differential the same way — a slightly wider differential (2-3 degrees F) on cooling prevents the fridge compressor from short-cycling, which can shorten its lifespan.
Expected result: the fridge only runs when the beer temperature climbs above your set point, instead of running continuously on its own thermostat.
A pilsner-style kit like the Grand Bohemian Czech Pilsner or a kit built around the American Lager style are the two most common reasons a home brewer needs this cooling variant in the first place — both are traditionally fermented cool, so check the printed instructions that come with whichever kit you're brewing for the exact target.


Prices shown reflect current 2026 listings and can change with promotions, so confirm the current price on the product page before ordering.
Which setup fits your situation
| Setup | What it needs | Best for |
|---|---|---|
| No controller, insulation only | Blankets or a fermenter wrap, a stable room | Best for rooms that already hold 65-70F year-round |
| Single-stage heating controller | Controller, heat wrap or space heater | Best for ale-style kits in a cold garage or basement |
| Two-stage heating + cooling controller | Controller, heat source, mini fridge | Best for lager-style kits or rooms with big swings between day and night |
Troubleshooting
- Controller shows a temperature that doesn't match a separate thermometer. The probe is likely reading room air instead of the fermenter wall — recheck that it's taped flush against the plastic and covered by insulation.
- Heat source cycles on and off every few minutes. The differential is set too tight for the heat source's power; widen it to 2-3 degrees F.
- Fermentation temperature keeps climbing even with the controller running. Active fermentation itself generates heat, sometimes several degrees above ambient — this is normal in the first 24-48 hours and settles as fermentation slows.
- Cooling setup never reaches the set point. The fridge or cooling method may not have enough capacity for the room it's in; move the whole setup somewhere cooler to start rather than asking the controller to fight a hot room.
- Controller display is blank or unresponsive. Confirm it's fully seated in the outlet and that the outlet itself is switched on, especially on a power strip with an individual switch.
Customize your fermentation setup
Once the controller is holding a steady number, the next upgrade is usually insulation quality and fermenter placement, especially if you're working in a small apartment or a shared space. A step-by-step guide to following your Mr. Beer kit instructions covers the fermentation timeline the controller is protecting, which is worth reviewing alongside this setup.
FAQ
Do I need a temperature controller for a Mr. Beer fermenter?
No, but it helps in any room that swings more than a few degrees between day and night. A controller holds a steady set point automatically instead of relying on you to notice and adjust the room manually.
What temperature should my Mr. Beer fermenter be kept at?
It depends on the specific kit and yeast style, so check the instructions included with your kit first. General ale ranges run 60-72F and general lager ranges run 45-55F, but the printed number on your kit takes priority over any general range.
Can I use any temperature controller with a Mr. Beer fermenter?
A standard two-stage digital controller with a probe works regardless of fermenter brand, since the controller is switching a heat source or cooling appliance on and off, not connecting to the fermenter itself.
Where should the probe be placed on the fermenter?
Tape it directly against the outside wall of the fermenter, roughly at the liquid level, then insulate over the top. A probe reading open room air instead of the fermenter surface will cause the controller to react to the wrong number.
What differential setting should I use?
A 1-2 degree F differential works for most single-fermenter heating setups. Widen it to 2-3 degrees F if the heat source or cooling appliance is cycling on and off too frequently.
Is a single-stage or two-stage controller better for home brewing?
A single-stage controller only switches a heat source, which covers most ale-style fermentation in a cool room. A two-stage controller switches both heating and cooling outlets, which matters if you're brewing lager-style kits or fermenting somewhere with big temperature swings.
Will a temperature controller change the taste of my beer?
Indirectly, yes. Holding a steady fermentation temperature reduces the harsh, hot, or overly fruity flavors that come from yeast working too fast in a warm swing, which generally produces a cleaner result.
Can I use a temperature controller with a small apartment setup?
Yes, a controller and a compact heat wrap take up little more space than the fermenter itself, which makes them practical for closets or small utility rooms.
One last thing
The single biggest mistake in this whole setup isn't the controller settings, it's probe placement — a probe reading room air instead of the fermenter wall will make an otherwise correctly configured controller chase the wrong number for the entire fermentation. Get that one detail right in 2026 and the rest of the setup mostly takes care of itself.


