Carbonating Your Beer with Priming Sugar

Carbonation is more than just adding fizz to your beer; carbonation also carries volatile aroma compounds in your beer up to your nose, giving beers a discernable smell. Carbonation also activates the trigeminal nerve in your mouth, and different levels of carbonation feel differently when they hit this nerve. There are two main ways you can go about carbonating your homebrew: priming sugar and force carbonation. For more detail on force carbonation, be sure to visit our force carbonation blog, as this blog is focused on carbonation using priming sugar.
Conditioning
- the process that follows primary fermentation, and allows the beer to reach the right level of carbonation (done in an airtight vessel, where the necessary pressure can be achieved)
- aging
With our extracts kits, built to keep the brewing process simple, we refer to two separate phases - carbonation and conditioning, while some brewers refer to everything after fermentation as conditioning. We provide separate time windows for each on our recipe pages. Our intention was to underscore the unique processes of beer carbonation and beer aging for folks just getting introduced to the hobby. Homebrewers frequently refer to the process of aging as conditioning, while commercial brewers use the term for all processes after primary fermentation.
The Waiting Is the Hardest Part
Another key reason why our instructions and recipe pages make the distinction between carbonation and aging is that each process deserves its own focused time window. Conditioning (as in aging) windows vary depending upon beer style. Some beers aren't meant to be aged at all. Making brewers mindful of the two actions should lead them to respect the time each step needs, but this isn't always the case. Many will rush through carbonation, accepting halfway fizzy beer, or rush through aging and lament that the beer could've been smoother. Moral of the story? Give each brewing phase its due time, and the proper conditions.
Bottle Conditioning, as in Carbonation
(The homebrewer and small brewery approach) This approach, though costlier, is an excellent way to keep oxygen out of bottles. The yeast in the bottle help scavenge oxygen. Beer exposed to oxygen can undergo oxidation, giving it a stale, cardboard flavor/aroma. Homebrewers and small breweries can have a hard time keeping oxygen out of their bottles, making bottle conditioning a smart choice. The only real downside with this approach is that many consumers dislike the appearance of yeast in their bottle. See our cold crashing blogif yeast in the bottle isn't your taste. Also known as: refermentation, bottle fermentation, secondary fermentation, final fermentation Why: Helps prevent oxidation, allows for proper carbonation followed by aging. How: Yeast consume the sugar, then produce the intended amount of carbonation. Though many homebrewers and breweries add in additional yeast and sugar for bottle conditioning, our kits leave more than enough yeast in suspension. Instead, our brewers simply add in sugar to carbonate their beer. Best for: Maturing beers or beers meant to have a longer shelf life. With what: Bottles (preferably glass or oxygen barrier bottles), kegs, casks, etc. Conditions are key: If bottles are stored too cold, the yeast will not metabolize sugar and create CO2, if stored too warm, the yeast can die before creating CO2.
Priming Sugar Carbonation in Bottles
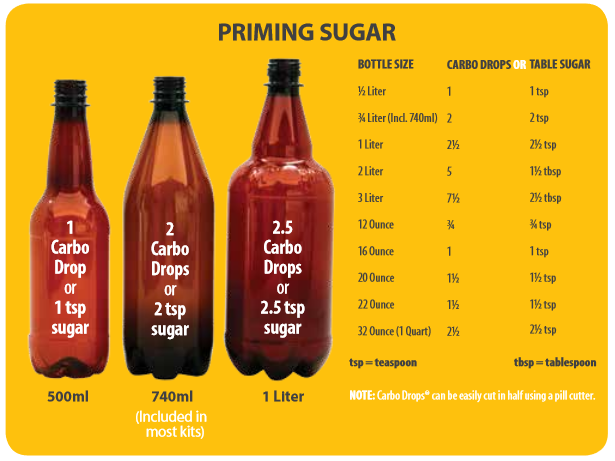
In our post "Homebrewing Guide for Beginners," we discussed how yeast placed in your wort eats away at the sugar in your beer, therefore creating CO2 and alcohol. When you carbonate in bottles, you add your fermented beer to bottles (which should taste like flat beer) and add an additional amount of sugar to begin a secondary fermentation that creates carbonation. This secondary fermentation in the bottles releases CO2, and that CO2 is then reabsorbed into your beer to create carbonation. The amount of sugar used in the process will determine the final amount of carbonation in your beer. While carbonating your beer in bottles, you should store your bottles in a dark area within the temperature range labeled for your recipe/refill for around 3 weeks. If you are using the plastic bottles in a Mr.Beer kit, your bottles should be rock hard before you place them in the fridge for drinking. You want to make sure you keep your leftover yeast happy until it has finished eating all the sugar, and placing them in the cold will make them sleep. You can use several different types of sugar to prime your bottles for carbonation: table sugar, corn sugar, or DME. Mr.Beer has carbonation drops which are simply sugar tablets pre-measured to carbonate the bottle sizes provided in our kits, which makes for a mess-free, simple carbonation process. If you are looking for how much sugar you should use in your specific bottle sizes, check out our priming sugar conversion chart.
When Aging, or Conditioning, Your Beer After Carbonation
- Different beer styles will require different aging times, as mentioned above. Just because one brew developed incredible flavor through a long period of conditioning, doesn't mean every single brew after that will need to be conditioned the same.
- Don't rush the process because you're eager for beer, many beer styles benefit from a long bottle conditioning period. Some dark beers can take MONTHS to arrive at their best flavor profile.
- The longer a beer conditions, the more at risk it is for oxidation. So, if you tend to enjoy beer styles that call for a longer conditioning window, oxygen barrier bottles are a smart purchase.
- Diacetyl is a buttery/butterscotch flavor found in beer. It develops during early fermentation, but decreases as beers mature. Healthy yeast will reabsorb diacetyl. Conditioning beer with remaining yeast in the bottles (bottle conditioning) will better allow you to eliminate buttery smells/flavors from your finished beer.


